|
|
|
|
t e c h n i q u e s 2
Pop-up Index |
|
Shinshi & Harite Ancient Japanese Technique of Stretching Silk A few years back when I was in San Francisco, I had the delightful pleasure of meeting John Marshall, one of the foremost silk artists skilled in the ancient technique of Japanese silk painting. John is world renowned for his beautiful Japanese kimonos (for which he has a huge market in Japan), and for his fantastic classes and workshops which he teaches in San Francisco. I was fascinated to see the method by which he stretched silk, and although I haven't tried it, my thoughts have wandered back to the Shinshi over and over these past years, so much so that I am sure I will give it a go very soon! What is Shinshi?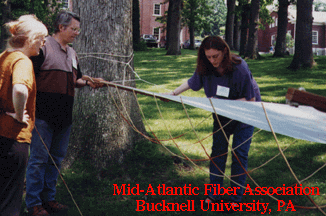 Shinshi are bamboo sticks not much thicker than a matchstick, which have a needle-sharp pin in each end. The Shinshi are always wider than the silk you need to stretch (from selvedge edge to selvedge edge), and you put them UNDER the fabric, so that if you placed one pointed needle end into the selvedge edge of the silk, and placed the other end into the other side of the silk, the bamboo Shinshi would look like a big curve under the silk (the bamboo Shinshi keeps the silk tight [taut]). This photo is from John Marshall's website, which has more detailed information.
The Shinshi are placed approximately every 6" [15cm] along the length of the silk, keeping it very taut (tightly stretched). Shinshi can be purchased in the USA from John Marshall's site, very inexpensively. Shinshi can also be purchased in Australia - if you know of other locations, please let me know so I can add the info to this page. The John Marshall sketch below shows what the stretched silk will look like. Can you make your own Shinshi? I have heard of a silk artist who made her own shinshi from an old matchstick bamboo shade/blind which was 60" wide (which means the piece of bamboo is certainly wider than the average piece of silk). Needles were attached to each end of the bamboo, securing the eye of the needle (not the sharp end) in a hole in each end of the stick with a strong waterproof glue. Over the years there has sometimes been a need to glue a needle back in, and on the odd occasion the bamboo has snapped when brittle. The beauty of using the bamboo blind/shade is that you can make them in many sizes to suit most scarf widths, very inexpensively. The technique using harike and shinshi has been successful for up to 5 yds [5 metres] of silk at a time, but remember do not try to stretch a lot of silk outside on a windy day! |

What is Harite?Harite are clamps used in Japanese silk painting. The length of silk is attached at each end to one Harite clamp, which is then tied to a tree (if painting outside on a gorgeous day), or doorknobs or other sturdy pieces of furniture which won't move.Each Harite consists of two pieces of wood - one has nails sticking up to lay the silk edge on, then the other side is pressed down, firmly clamping the two pieces of wood on the top and bottom of the silk. A second Harite is attached to the OTHER end of the silk and when both ends are securely clamped, you can tie the two Harite to non-moving objects to keep the length of silk pulled tight. John Marshal has kindly provided Instructions on how to make your own Harite on his website, click here for more info. |
Making your own Gutta ResistI came across some information on making your own gutta-like substance, and thought it was worth a try. The Japanese technique of painting on silk incorporates Katazome (paste resist), which is used by the most well-known US silk artist using the Japanese techniques - John Marshall; check out his Katazome Page: http://www.JohnMarshall.to.My textile artist friend Lili suggests making a much simpler corn starch paste which she has had much success with. "In traditional paste resist in Japan called Katazome one would use rice flour paste, but corn starch works OK and flour and water is adequate, but harder to wash off."
When the fabric is totally dry (and if you've used fiber reactive dyes which don't need steaming), wash it to remove the paste. If your dyes require steaming, do so, and then wash the fabric afterwards. Note: try this first on a piece of fabric which is not for a client! Test it out to see if it's something you could use in other projects - not everyone likes the way the paste gets applied to the silk - a bit gluggy, but worth experimenting with! |
Picot stretching stripsThe French silk artists in days gone by had a clever approach to stretching silk. They created strips of wood which had fine sharp pins protruding upwards, which were used on each end of cut fabric. The idea was (and still is) to attach the picot strips to support legs of some kind (adjustable saw horses, trestle legs), then attach the cut end of silk to one picot strip, stretch the length of silk (can be metres/yards long) to the other picot strip some distance away.The sharp "teeth" of the picot strip hold the fabric securely in place, and the trestle legs can be moved further apart to create a tightly stretched piece of silk. If you like, you can also attach the picot strips to a frame so that the long sides (selvedge egdes) of the silk can be secured at intervals along the length of the frame, using one of several techniques. [Side strips of 1x2" lumber can be secured to the frame with C clamps, all available at hardware stores.] Where can you buy picot strips?
Dyeing and painting silk and other fabricsI've just found a wonderful site chockfull of fabulous information - Paula Burch's All About Hand Dyeing at http://www.pburch.net/dyeing.shtmlPaula covers How To Die, Batik, Tie-dye, and many other sources of information. Here is a selection of information from Paula's site on http://www.pburch.net/dyeing/aboutdyes.shtml: " About the DyesYour choice of dye depends directly on what kind of fabric you are using. You'll get bad results if you use a wool dye on cotton, or a cotton dye on wool, or either on polyester.Dyes for Cellulose FibersThis is your choice if you want to dye a t-shirt. Cellulose fibers include cotton, linen, rayon, hemp, ramie, and tencel. For the best, brightest results, use fabric that is composed of at least 80% of one of these fibers, though it is possible to dye fabrics containing as little as 30% natural fiber, with varying results.Fiber Reactive dyesThe material from this section of this page has been moved to a new page on Fiber Reactive Dyes for Cotton, Rayon, and Silk, which is currently undergoing expansion.Direct dyesThe material from this section of this page has been moved to a new page about Direct Dye.Vat dyesThe material from this section of this page has been moved to a new page about Vat Dyes.Napthol dyesCotton can also be dyed with azoic or naphthol dyes. Azoic or naphthol dyes use more hazardous chemicals and are therefore much less desirable for home use; furthermore, it is deemed too harzardous to be allowed to be imported in the US. The dyes are still being used by novice craftspeople in Australia, however, and the way the dyes work is fascinating.All purpose dyesThe material from this section of this page has been moved to a new page about All purpose Dye.Dyes for Protein FibersThe material from this section of this page has been moved to a new page about About Protein Dyes, which is not yet completed and needs to have further information inserted into it.Dyes for Synthetic FibersPolyester requires the use of disperse dyes.The material from this section of this page has been moved to a new page about Disperse Dye for Polyester. Oddly, nylon, which is a truly synthetic fiber, happens to dye quite well with the same acid dyes that work on wool and other animal fibers, in addition to dyes that work on polyester. For more information on dyes for nylon, see Dyes for Protein Fibers. You'll want to test a swatch before committing yourself to the project, as nylons vary. Acrylic fiber can be dyed with disperse dyes or with basic dyes. Basic dyes appear to be easy to use, can be used for hand-painting, and result in particularly brilliant colors, which are quite washfast on acrylic. However, they dye everything permanantly, including your containers, your sink, your counter, your floor, or anything else they get on to, unlike most other types of dye, and they may be much more hazardous than the other dye classes. They are not for use by the beginner, certainly, and not for use by most experts, either. The only source I've found for basic dyes is the Aljo dye company. (See Sources for Supplies.) Fabric PaintsFabric paints may be used on any type of fiber that can tolerate any required heat-setting. (Not all paints require heat setting.) Fabric paint is a mixture of a pigment and a glue. In many cases, the paint will leave an extremely disagreeable feeling on the fabric, unlike dye, which leaves no "hand" at all. A few high quality paints give quite satisfactory results, especially when diluted. "Check out Paula's site - you never know what you might learn! |
several Polls & Surveys ...
please fill them in and we
will share the results each month.
thank you!
AustralianSilkworm.com © 2003-2004