|
|
|
|
|
t e c h n i q u e s
if you know of an interesting technique for painting on silk, share it with us here - who knows what wonderful results we can get from new and exciting painting ideas?
|
|
 M
andy Southan of Silk Painters Guild UK, explains there is an alternative system to mixing darker colours using black. "It is often called the dual-primary system which has two blues; two reds and two yellows but definitely no black! Look on the workshops page for the article on colour mixing which is taken from my book 'Beginner's Guide' or, if you really want to go all out, get Michael Wilcox' comprehensive book 'Blue and Yellow don't make Green' which is also available from Search Press. " Mandy is world renowned as a silk artist and has written many books on the subject. To learn more about the colour wheel, read Mandy's article on the Silk Painters Guild UK website.
M
andy Southan of Silk Painters Guild UK, explains there is an alternative system to mixing darker colours using black. "It is often called the dual-primary system which has two blues; two reds and two yellows but definitely no black! Look on the workshops page for the article on colour mixing which is taken from my book 'Beginner's Guide' or, if you really want to go all out, get Michael Wilcox' comprehensive book 'Blue and Yellow don't make Green' which is also available from Search Press. " Mandy is world renowned as a silk artist and has written many books on the subject. To learn more about the colour wheel, read Mandy's article on the Silk Painters Guild UK website.
F lower Pot Technique Teena Hughes, Australia I recently attended a textile painting class where I saw the most extraordinary way to paint and finish silk without steaming - even though "steamfix paints" were used ... You will need: 
Ok, that's the "quickie" blurb, now here are the step-by-step instructions. The colours for this example are: magenta or bright pink, red, and black. Always work in a well ventilated space, with windows open if possible.
TIPS:
If you end up with a piece of silk you think is fabulous and you'd like to share it, please email us a photo and we'll show it on this page with your name. T urmeric - more than just a spice Lili Pintea-Reed [Lili writes for www.suite101.com - excellent fiber arts info] Tumeric - yes that seldom-used spice on the shelf - makes a wonderful deep gold dye on protein (wool, mohair, etc) and cellulose fibers (cotton, ramie, flax, etc.)and *does not* need a mordant. In the Orient it is used as a substitute for the much more expensive saffron in dyeing monks cloaks. Here are some of my dyeing experiments below: MATERIALS one ounce ground tumeric a gallon of water one gallon plus pot old dish towel to strain mixture (optional) seive (optional) Directions: Experiment #1 Boil the water and tumeric to extract dye and let it sit over night. It will be a greenish/yellow color with bits of dye plant floating about it. You can re-heat and add the skeins directly to the mixture. This will produce the best color. I got a very rich orangey/gold on wool, but it took forever to rinse all the little bits of ground tumeric root off the yarn. Experiment #2 On my second attempt I let the dye sit over night and strained it through a cloth-lined sieve to catch the dye stuff... Its a very powerful dye. The old dish towel still has a nice yellow circle in the middle from the dye strainings. I added several skeins of wool, and a few sample skeins of cotton and ramie. They all took on a wonderful rich deep gold color --- very much more intense than most of the natural dyeing I've done. Skeins dyed in the afterbath were increasingly lighter gold with touches of green. Experiment #3 As the after bath exhausted to a light gold, I threw a bit of red koolaide and some vinegar in the pot. I dyed one skein of wool a sort of peach color. It was quite pretty and the vinegar had no effect on the color. I was very pleased with these results. I'd recommend tumeric dyeing to anyone as it is cheap to do, and the materials are very easy to aquire at the local grocery. Its safe for kids and needs no mordant at all. My six year old loved helping make yellow. My results have been fast through normal hand washing and wear. No fading yet. Actually, the dish towel has been repeatedly bleached and the yellow circle is still very much there... So watch where you spill....!!! :-)) Lili
W hat isShibori? Shibori - Ancient cloth wrapping and dye technique [From the website of Deborah Hamouris] "Silk is folded in a chosen pattern (often randomly), then wrapped on the pole with thread. The fabric is then compressed together, rather like pushing up a shirt-sleeve on your arm, creating folds and valleys. Once it is wrapped, dye is hand-painted onto the fabric and it is dried in the sun or near another heat source. the work is then unwrapped, heat set, rinsed & ironed. I occasionally vary the characteristic stripe pattern with floral bursts, which when wrapped, resemble noses on the pole. Other designs have emerged with experimentation over the years. I choose to work with silk because of it's sensual and luxurious appeal. In keeping with that, I check all my fabric for flaws, pulls and stains before dyeing, rejecting that which is found lacking. Quality is a very important element in my final products." To read more and to see the photos of silk wrapped around plumbing poles, click here. From Concetta who shows her beautiful work at fabdesigns.com, comes the following: "Shibori is an ancient Japanese art form of transforming fabrics into wearble art. Shibori is often used to describe a variety of ways of embellishing textiles to create visually intrigueing fabrics. The fabric is manipulated by folding, crumpling, stitching, plucking and twisting the cloth. Binding and knotting then securing it. The major groups of shibori include stitching, folding, pole wrapping, and binding. The main techniques that we use on our original rayon knitwear designs are: Arashi shibori or pole wrapping and Mokume Shibori, which is a stitching technique. I usually start with raw yarns or yarns already colored to coordinate with our clients wardrobe pieces. My husband Bruce custom knits the fabric panels to the required measurements of each garment pattern piece. We often mix our original knitted jacquards, laces, and surface textures with several Shibori techniqes to achieve absolutely gorgeous works of wearable art. The fabric then is scrunched in different ways while wrapping. Next, I paint the dye onto the fabric. I layer the colors to get different color variations. Then the dye and fabric must dry which can take several days. After the dye is set, then the fabric is rinsed and washed. Sometimes I rework the fabric with a second or third round of hand painting. On one popular coat I paint Chinese characters on in the final layer. Only after each panel is critiqued and artist-approved is it sewn into a garment or stretched onto a frame - suitable for wall hanging. These are the very same exquisite quality garments seen in wearable art galleries and at the chicest boutiques in Beverly Hills, Santa Barbara, Del Mar, Boca Raton, Etc. You can now buy decadent hand-dyed Shibori Coats, Gowns, Dresses, and Tops direct from the designer. " [And now you can learn how to create Shibori yourself! Time consuming but results are well worth it. Teena] For photos of wrapping and rolling the silk in the shibori technique, check out this photo Tutorial by Cozy Bendesky. BONUS! Learn how to make Shibori Paper online with Carol Duvall 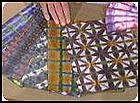 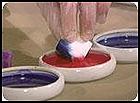 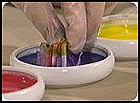 photos copyright hgtv.com
several Polls & Surveys ... please fill them in and we will share the results each month. thank you! |
AustralianSilkworm.com © 2003-2004
|
Pour obtenir une traduction approximative de cette page, cliquetez dessus le drapeau approprié!
íPara conseguir una traducción aproximada de esta página, chasque encendido la bandera apropiada! Um eine ungefähre Übersetzung dieser Seite zu erhalten, klicken Sie an die passende Markierungsfahne! Per ottenere una traduzione approssimativa di questa pagina, scatti sopra la bandierina adatta! |